Full Version: Color Filling
From: Zak [#1]
19 Nov 2005
To: ALL
To all,
I have a rush order for RS Ownes plaque number RM1420. It is on page 77 of their catalog.
I have the item in stock and engraving is no problem. I am really stuck on color fill. I have rub n buff and I don't really know how to use it. I am not even sure it is the right product to use.
As I mentioned in my last post, I am very new to this.
Tips or direction to previous threads would be greatly appreciated.
Thank you.
From: Engravin' Dave (DATAKES) [#2]
19 Nov 2005
To: Zak [#1] 19 Nov 2005
EDITED: 7 Jun 2010 by DATAKES
From: Zak [#3]
19 Nov 2005
To: Engravin' Dave (DATAKES) [#2] 19 Nov 2005
From: Engravin' Dave (DATAKES) [#4]
19 Nov 2005
To: Engravin' Dave (DATAKES) [#2] 19 Nov 2005
Zak,
Fill out some basic information in your profile and we will all be able to help more specifically to your needs. Did you laser or rotary engrave the material?
From: Zak [#5]
19 Nov 2005
To: Engravin' Dave (DATAKES) [#4] 19 Nov 2005
I will fill out more info.
I have a Gravograph LS900 40 watt.
The piece is laser engraved and the engraving came out nice, clean and deep.
From: Engravin' Dave (DATAKES) [#6]
19 Nov 2005
To: Zak [#5] 19 Nov 2005
Zak,
On materials like this I will cover with a polyester mask material or low adhesive transfer paper, laser engrave, than spray with a couple light coats of Krylon spray enamel. After adequate drying time I will remove the mask material. The areas inside the letter may have to be removed carefully with a razor blade.
This advice may be too late for you on this job but may help in the future.
I will yeild to others on the Rub N Buff advice. I have never used it.
From: Zak [#7]
19 Nov 2005
To: Engravin' Dave (DATAKES) [#6] 19 Nov 2005
David,
Is Krylon spray enamel something they would sell in an art supply store?
From: Engravin' Dave (DATAKES) [#8]
19 Nov 2005
To: Zak [#7] 19 Nov 2005
From: Zak [#9]
19 Nov 2005
To: Engravin' Dave (DATAKES) [#8] 19 Nov 2005
David,
Thank you so much. For your information, it was not to late and I will be able to use your method.
I love this industry, but there is still a lot to learn.
Thank you again.
From: Engravin' Dave (DATAKES) [#10]
19 Nov 2005
To: Zak [#9] 19 Nov 2005
Zak,
You will never stop learning, and you are in good company here at the EE forum. I've been in the business for five years and have never been happier with that decision. I can't imagine doing anything else.
For black paint-fill, I prefer to use the semi-flat finish. It seems to dry faster.
From: Stunt Engraver (DGL) [#11]
19 Nov 2005
To: Zak [#3] 19 Nov 2005
Zak,
Rub 'n Buff (RNB) is used pretty much as its name implies.
You rub the product into your image, with your fingers, let dry for a short while, then clean (buff) the surface of the substrate, with a clean cloth.
Stubborn areas of RNB, on the surface, can be removed by adding a small amount of WD-40 to the cloth.
If you're cleaning an area of wide coverage, to prevent the removal of color from the image, wrap your cloth around something flat, (ruler, piece of engraving stock) and use circular motions to remove the unwanted RNB.
EDITED: 19 Nov 2005 by DGL
From: Zak [#12]
19 Nov 2005
To: Stunt Engraver (DGL) [#11] 19 Nov 2005
David,
Great advice. Other than the ruler trick (which is awesome), I did primarily that. It just seem to get really messy and difficult to get off the surface.
Myabe the ruler will make that easier. The other problem is that the cloth starts spreading the color really quickly.
The stuff has been out for a while, so I imagine it has to work.
From: Stunt Engraver (DGL) [#13]
19 Nov 2005
To: Zak [#12] 19 Nov 2005
Zak,
That's where the WD-40 comes in handy. It will break down the RNB and creates enough of a "glide" to prevent color from being pulled out of your image.
Make sure to keep changing to a clean area of the cloth, while cleaning, or you'll just smear the color around.
Here are a couple of other threads on color-filling:
http://www.engravingetc.org/forum/index.php?webtag=EE&msg=66.1
http://www.engravingetc.org/forum/index.php?webtag=EE&msg=77.1
EDITED: 19 Nov 2005 by DGL
From: Stunt Engraver (DGL) [#14]
19 Nov 2005
To: ALL
I use this method almost exclusively.
Using a "quick dry" enamel, cover the entire area of engraving with paint. No need to use a brush; you're just "flooding" the area with paint.
Notice the various colors of paint on what I call my "paint stick." When changing from one color to another, all that's necessary, is to clean the stick. No messing around with brushes.
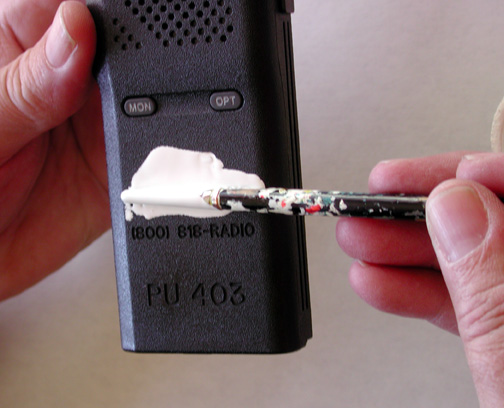
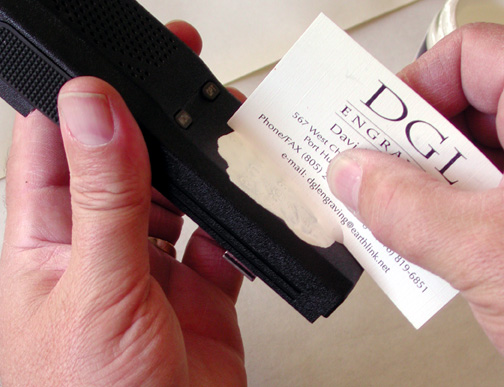
Using a business card, (preferrably those outdated), "squeegie" the excess paint from the surface. The goal is to have as little paint as possible remaining on the surface. A thin film is ideal.
The following picture shows about as much paint as you'll want remaining on the item's surface.
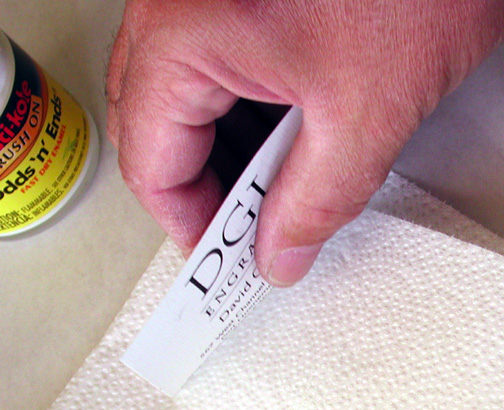
Scrape the excess paint back into the jar (recycling) and wipe the card clean, onto a paper towel. Re-squeegie your item, if necessary.
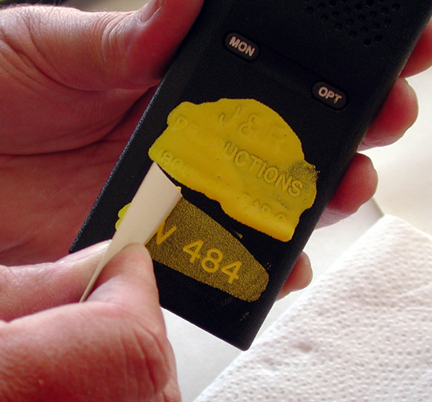
Let the paint dry for 10-15 minutes, before attempting to do the final cleaning. Don't let the paint dry completely, or you'll have an ordeal on your hands, in trying to remove the excess from the surface of your item.
You can get a lot of mileage from both the paint and your business cards, using this method. I once paint-filled 300 walkie-talkies from one jar of paint.
I like the brand of paint shown in the background of the previous photo. Made by Plasti-Kote, called Odds 'n' Ends, it comes in a wide spectrum of colors and is usually dry enough for final cleanup in about 10-15 minutes. I usually find this brand of paint in hardware stores. Costs about $3.00 per jar.

Enamel is more stubborn than Rub 'n Buff and requires a two-step cleaning process. I use naptha (lighter fluid, Ronsonol, Zippo) on a clean cloth, to remove the bulk of the paint.
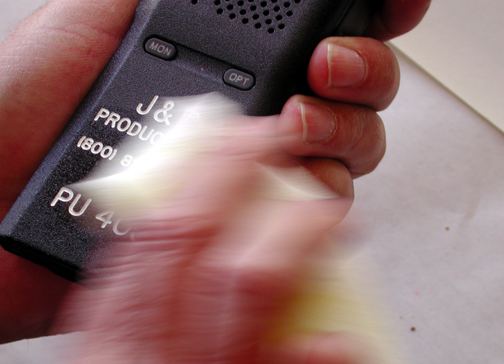
I then follow up with WD-40 as a means of removing the leftover "haze" as well as it acting much like Armorall and producing a slick clean surface.
Try it. You'll like it! :-)
EDITED: 29 Jul 2008 by DGL
From: Zak [#15]
19 Nov 2005
To: Stunt Engraver (DGL) [#14] 19 Nov 2005
Wow. Thank you for the detail... The photos are great. Next to my wife (who is in the room ;-)) this forum is the greatest thing I've found.
Can't wait to try all of these great techniques.
Thanks
Zak
From: Stunt Engraver (DGL) [#16]
19 Nov 2005
To: Zak [#15] 19 Nov 2005
We're happy to be running a close second to your wife. :-)
From: Rodney Gold (RODNEY_GOLD) [#17]
20 Nov 2005
To: ALL
A tip for RnBuff is to use turpentine , all the wax based metal/coloured pastes clean up well with turps.
There are much cheaper alternatives than RnBuff found at any craft shop with far mor colour choices too. Gilding pastes etc.
Meths will remove excess dried ducos etc without damaging most surfaces and it also doesnt matte the surface of the paint like thinners etc, but be careful with lasered plastics as meths will also cause stress cracking (as will most solvents)
We buy recycled scrap fabric and use the thin fluff free t-shirt material stretched over a wood block or scrap pex squares as a "rubber"
Be carefull with RnB and other wax based products with stuff like granite and marble or other porous stuff , it stains the surface and is impossible to remove , same with paints on anodised surfaces which arent often well sealed.
From: Harvey only (HARVEY-ONLY) [#18]
20 Nov 2005
To: Rodney Gold (RODNEY_GOLD) [#17] 20 Nov 2005
From: Ed (EMANA) [#19]
20 Nov 2005
To: ALL
David,
Excellent photos! Can you include one before finish coat and one after you clean?
Ed
From: Stunt Engraver (DGL) [#20]
20 Nov 2005
To: Ed (EMANA) [#19] 23 Nov 2005
Thank you Ed. Credit for the photos goes to my better half, Robyn.
Sorry to tease. Those were a few photos I had handy. They're a few of the images I plan to use in an in-depth "artitorial" for lack of a better term.
Due to popular demand (yours) I've gone back and added a few photos to my post.
The real story is about the engraving of communications equipment (walkie-talkies) which require paint-filling.
Everyone needs a niche and engraving two-radios has been one of my strongest.
EDITED: 20 Nov 2005 by DGL
Show messages: 1-20 21-31