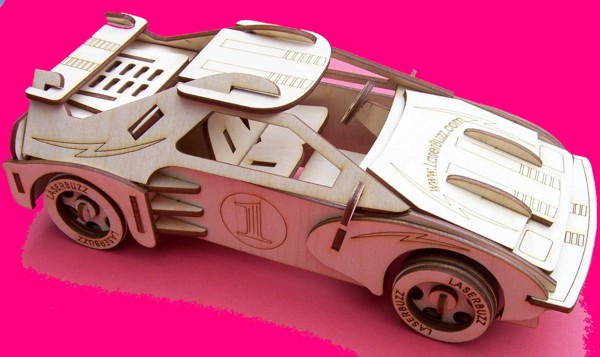
Full Version: A gift from Laser Buzz-Car
From: Harvey only (HARVEY-ONLY) [#1]
11 May 2006
To: ALL
These are the Corel files, (version 9) for the car.
Page 1 of layout
Page 2 of layout
Assembly directions
Thanks Buzz
EDITED: 16 Aug 2006 by HARVEY-ONLY
From: Buzz [#2]
11 May 2006
To: Harvey only (HARVEY-ONLY) [#1] 11 May 2006
EDITED: 14 May 2006 by BUZZ
From: LipChip [#3]
11 May 2006
To: Buzz [#2] 11 May 2006
From: Harvey only (HARVEY-ONLY) [#4]
11 May 2006
To: Buzz [#2] 11 May 2006
From: Tom (TJGEENEN) [#5]
11 May 2006
To: Buzz [#2] 11 May 2006
Thanks Tom, that is really cool. Get that dog software ready, I'll call you next week for it.
Thanks,
From: Buzz [#6]
12 May 2006
To: Tom (TJGEENEN) [#5] 12 May 2006
Hi Tom,
Let me know if the instructions work for you on the car. Note:I forgot to change the font to curves. Look forward to hearing from you next week. Have fun with the car. Did you get the free House design I sent out to my customers?
From: Nick (WOODWORKNICK) [#7]
13 May 2006
To: Buzz [#6] 14 May 2006
Sir thanks for posting the race car. I will make one for my granddaughter. I appreciate your generosity. Ps I did not see the house plans. Is that just for you customer's?
Nick
www.lasergoodies.com
(homemade for now)
woodworknick@yahoo.com
EDITED: 13 May 2006 by WOODWORKNICK
From: Buzz [#8]
14 May 2006
To: Nick (WOODWORKNICK) [#7] 14 May 2006
From: Carl (CSEWELL) [#9]
14 May 2006
To: Buzz [#1] 14 May 2006
The "instructions" CDR file says to follow the number instructions. Are there words to go with those numbers?
Thanks.
- Carl
From: Dave Jones (DAVERJ) [#10]
14 May 2006
To: Carl (CSEWELL) [#9] 14 May 2006
The numbers shown on the instruction page give numbers to the various slots and tabs for the parts that are actually cut out from the drawing #1.
Just find the same number on 2 pieces and those slots/tabs push together. (find slot 1 on one part and slide it into slot 1 on the other part with that number on it) If there are letters also, then more than 2 pieces are involved (ie: 15A, 15B, and 15AB all go together)
From: Carl (CSEWELL) [#11]
14 May 2006
To: ALL
Yup. I understood all that. I was just wondering if there were any additional instructions, like putting together certain pieces as sub-assemblies, or where #17 went to (I did a text search and Corel couldn't find it either), etc.
Thanks, though.
From: Dave Jones (DAVERJ) [#12]
14 May 2006
To: Carl (CSEWELL) [#11] 14 May 2006
Maybe a design change? ;-)
I haven't tried it yet, but my gut feeling would be just start at #1. The lower numbers look like an inner chassis, and the higher ones look like the outer trim.
From: Carl (CSEWELL) [#13]
14 May 2006
To: Dave Jones (DAVERJ) [#12] 14 May 2006
Yep, and a dry-run will probably verify that. Unfortunately, with all the small pieces, a dry-run will be difficult and a re-do, with glue, could get quite messy!
It would've been nice, also, if the instruction numbers had a sequential list that pointed to the numbers in the drawing. For example, a vertical column of the sequence of numbers with a double (or more) set of lines pointing to each piece. That would make assembly a whole lot easier to follow, in my opinion. And it would've pointed out the missing 17.
Not that I'm complaining. Free is free. I just wanted to know what I was getting into before I got started.
- Carl
EDITED: 14 May 2006 by CSEWELL
From: Engravin' Dave (DATAKES) [#14]
14 May 2006
To: Carl (CSEWELL) [#13] 14 May 2006
From: Carl (CSEWELL) [#15]
14 May 2006
To: Engravin' Dave (DATAKES) [#14] 14 May 2006
Done! And how did I do it? Very carefully!
From: Buzz [#16]
14 May 2006
To: Carl (CSEWELL) [#9] 14 May 2006
Hey Carl,
I like designing, but I can't write instruction worth a c__p :-) .
You are suppose to follow the numbers sequentially and I think I did miss #17, I must have been between counting my fingers and toes and got mixed up or I might have sneezed and lost count, oh hell I don't have a good excuse >.<
Heaven forbid I put out my over 300 piece Doll House design. Actually heaven forbid if I have to make instructions. :S
EDITED: 14 May 2006 by BUZZ
From: Dave Jones (DAVERJ) [#17]
14 May 2006
To: Buzz [#16] 14 May 2006
Buzz, I'm curious about your design technique. Do you cut out a bunch of pieces with paper and scissors until you get it close? Or use a 3D modelling program? Or .... ???
Enquiring minds want to know. :D
From: Buzz [#18]
14 May 2006
To: Dave Jones (DAVERJ) [#17] 14 May 2006
I use a 3D program, a bottle of aspirin, and a couple of swear words every now and then. ;-)
Actually I enjoy making these items, but they would be difficult to make money with compared to our Wall Tribute products. I've made a few for a die cut company, which can produce in quantity but they don't look as good as lasered.
EDITED: 14 May 2006 by BUZZ
From: Carl (CSEWELL) [#19]
14 May 2006
To: Buzz [#18] 14 May 2006
From: Buzz [#20]
14 May 2006
To: Carl (CSEWELL) [#19] 14 May 2006
My 3D is just the starting point; tabs, slots, embellishments are all added after the fact. My first generation as I call it looks very rough. I create a finished piece that might take many generations to create. Especially when I get carried away.
I made the torrent, all the latch doors, and a bottom access panel fully operational on the tank, now that took nothing but good aspirin!
I've started making furniture, here is a picture of my first piece. Now remember it is the first generation :-) I like to start with the most used piece of furniture first.
EDITED: 14 May 2006 by BUZZ
Show messages: 1-20 21-40 41-59