Full Version: Distributing objects horizontally
From: Webquest [#1]
4 Dec 2006
To: ALL
Hello!
I'm laying out a deskplate for a customer with a standard company logo and text box with name/title. I usually distribute the two elements so there is equal spacing between the logo and left side of the plate, between the logo and text, and then between the text and right side of the plate.
I usually do the calculations manually, but was wondering if CorelDRAW X3 has any features that would allow me to do this automatically? It would save me A LOT of time on a big job I'm doing. I've tried selecting both objects and playing with options under Arrange -> Distribute but it never seems to work right. Any ideas?
Thanks!!
From: LaZerDude (C_BURKE) [#2]
4 Dec 2006
To: Webquest [#1] 4 Dec 2006
HI Webquest,
What *I* do in that situation is to group the logo and the text then ust CTRL-C and CTRL-E to center in the box. It works well.
From: Webquest [#3]
4 Dec 2006
To: LaZerDude (C_BURKE) [#2] 4 Dec 2006
You copy and export?
I thought I was confused before! >.<
If I group them and then "C" and "E," they both end up centered on top of one another.
EDITED: 4 Dec 2006 by WEBQUEST
From: Mike (MIKEN) [#4]
4 Dec 2006
To: Webquest [#3] 4 Dec 2006
Maybe he means "shift C and shift E.
If you have a lot of these to do you might find Carl Sewell's macro useful. http://engravingetc.org/forum/index.php?webtag=EE&msg=4435.1
EDITED: 4 Dec 2006 by MIKEN
From: LaZerDude (C_BURKE) [#5]
4 Dec 2006
To: Webquest [#3] 4 Dec 2006
Yes that will happen. This is why you MUST "group" the logo BEFORE you center the logo and text in the box.
It is not a copy and export. CTRL-C centers the groupvertically in the box, while CRTL-E centers the group horizontally. The key is to group your text and logo first.
By the way, what is your name?
From: Webquest [#6]
4 Dec 2006
To: ALL
Hi there,
The logo is grouped, but if I follow your instructions and group the (grouped) logo together with the text, and then try to "C" and "E" them, they still end up on top of one another. :/
I appreciate your suggestions, though. I just can't figure if there is an easier way to automatically space them out equally.
Tom
From: Engravin' Dave (DATAKES) [#7]
4 Dec 2006
To: Webquest [#1] 4 Dec 2006
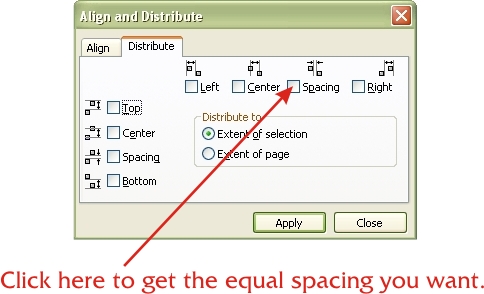
Place a vertical line precisely on the left and right side of your plate layout area, group the logo, group the text, center and align all objects vertically, then select all, go to Arrange > Align and Distribute > Align and Distribute, and select the spacing box as shown in the image below. This will give you the spacing you want. Be sure to remember to remove your two vertical lines before engraving.
From: Mike (MIKEN) [#8]
4 Dec 2006
To: Engravin' Dave (DATAKES) [#7] 4 Dec 2006
If you were doing a full sheet of name tags could you use this over the entire sheet by extending the lines and setting them in each column?
From: Webquest [#9]
4 Dec 2006
To: Engravin' Dave (DATAKES) [#7] 4 Dec 2006
Wow! That's it. Thank you, Dave, and thank you to everyone who replied!
Tom
From: Engravin' Dave (DATAKES) [#10]
4 Dec 2006
To: Mike (MIKEN) [#8] 4 Dec 2006
It gets more complicated when you start talking about columns because you need to address the vertical and horizontal spacing.
I would recommend doing one tag, then place a box around your objects in the exact dimension and layout of your tag, then group everything. Once you have that grouped name tag you are in great shape to copy, paste, use the spacing option.
As an example, if you have a 1"x3" tag, you would want your layout dimensions to be divisible by 1" in height and 3" in width. If your table is 20"h x 24"w you can cut and paste to where you have 20 unevenly spaced name tags in your column. At this point you should select and align one name tag to the top of your layout area. You can then select and align on other name tag to the bottom of the layout. Now, with all other name tags located between those two, you can select all of them, and go into the Align and Distribute option and select the vertical spacing button as shown below. This will space the 20 tags edge to edge over that 20" span.
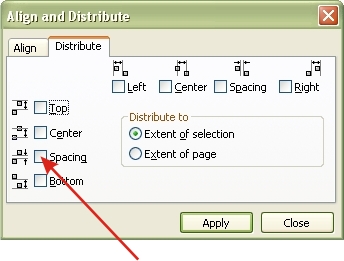
Now you can select the 20 badges and align them with the left edge of the layout area, then group them. Now, we want to go 24" across, so we know we will need to copy and paste this column of tags 7 times so we end up with 8 columns. Once you've done that, select one of the columns and align it with the right side of your layout. You now have a column aligned on the right and left, so with all other in between those two, highlight all columns and select the horizontal spacing button on the Align and Distribute option.
I would have a perfect grid of 160 name badges.
Depending on the type of laser you have, you may have to allow for the area along the rulers where the laser doesn't fire. You would make this adjustment after you have created and grouped your complete grid.
There may be an easier way, or even better, a macro, that could do this with the push of a button. That being said, I could do what is described above in no more than a minute or two
From: Mike (MIKEN) [#11]
4 Dec 2006
To: Engravin' Dave (DATAKES) [#10] 4 Dec 2006
Thank you. I'll give it a try.