Full Version: welding text
From: LaZerDude (C_BURKE) [#5]
9 Jan 2007
To: Harvey only (HARVEY-ONLY) [#4] 9 Jan 2007
One may as well be blind as well. Did I send you a Christmas ornament a couple of years ago in your Maui care package?
I think it might be easier to conver the individual letters to curves, THEN over lap and intersect/weld. Using the segment delete tool, one can then delete the unwanted segments creating a hairline outline while maintaining the part that is not to be cut. At least that is what I did with the Christmas ornaments I made a couple of years ago.
Now go put batteries in your flash light.
From: ab_laserart [#6]
9 Jan 2007
To: LaZerDude (C_BURKE) [#3] 9 Jan 2007
for example...
I'd like to cut this out of acrylic and/or wood which is no problem, but with some fonts the text just blends together so I need to engrave the seperations between letters. er somethin.
EDITED: 9 Jan 2007 by AB_LASERART
From: ab_laserart [#7]
9 Jan 2007
To: Harvey only (HARVEY-ONLY) [#4] 9 Jan 2007
Alright Harvey, you are pickin' up what I'm laying down. I'm going to try this when it is not 12:04 a.m. I-) From the sounds of it I might be trying it until 12:04 a.m. tomorrow :'-(
Thanks for the help,
Ron
From: LaZerDude (C_BURKE) [#8]
9 Jan 2007
To: ab_laserart [#6] 9 Jan 2007
Ron,
Now that I have seen what you are trying to do it is much clearer.
Yes, Harvey is on the right track but I "think" there is an easier way. Unfortunately I will need your files to play with to be sure. ( both the original letters and the welded ones.
I can see how to do it in my minds eye, but do not know how to explain the steps because I seldom keep track of them ( uh DUH!) So if you can email me the file(s) I will see if I am correct and then keep track of and post my steps.
You can email me at apawards? AT hawaii? DOT rr? DOT com? (removing the question marks of course)
From: Dave Jones (DAVERJ) [#9]
10 Jan 2007
To: ab_laserart [#1] 10 Jan 2007
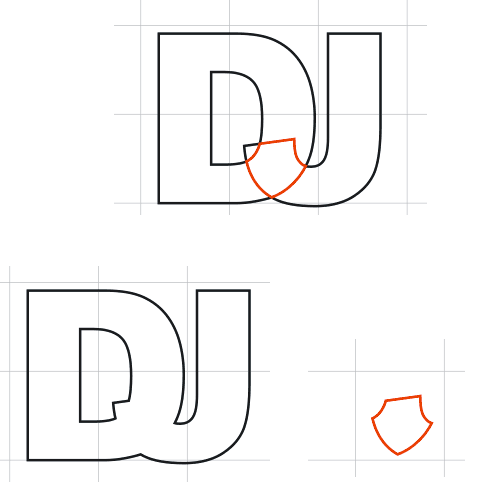
1 - convert the letters to curves, no fill, black hairline outlines
2 - select the two curves (letters) and hit the intersect button
3 - right click on the red palette color to set the outline to red for the new curve created by the intersect (or do it in object properties)
4 - go back and reselect the original 2 curves (letters) and click the weld button
At this point you have a black outline around the outside of the combined letters and you have a red line that follows the places where they intersected. When you engrave the red lines and cut the black lines you'll end up with the welded letters cut out and the inside lines of the letters engraved.
EDITED: 10 Jan 2007 by DAVERJ
From: ab_laserart [#10]
10 Jan 2007
To: Dave Jones (DAVERJ) [#9] 10 Jan 2007
DAVE, YOU'RE A GENIUS!!
I knew it could be done without first having to attain a graduate degree in rocket science! (Unless, of course, you have a graduate degree in rocket science) 8-O
Thank you very much,
Ron
From: Pedaler (ROYBREWER) [#11]
10 Jan 2007
To: ab_laserart [#10] 10 Jan 2007
I know you said Corel 12, but the SmartFill tool with X3 makes this with fewer strokes.
From: Harvey only (HARVEY-ONLY) [#12]
10 Jan 2007
To: Dave Jones (DAVERJ) [#9] 11 Jan 2007
I tried to answer a few hours ago, but Verizon and Web service were not getting along very well at that time.
What an elegant solution. I printed it out for future use. It will get a lot of that with my projects. Thank you. Thank you. Thank you.
From: LaZerDude (C_BURKE) [#13]
11 Jan 2007
To: ab_laserart [#10] 11 Jan 2007
Ron,
Dave did what I was wanting to do. There you go. I knew there had to be a pretty easy way and that was it.