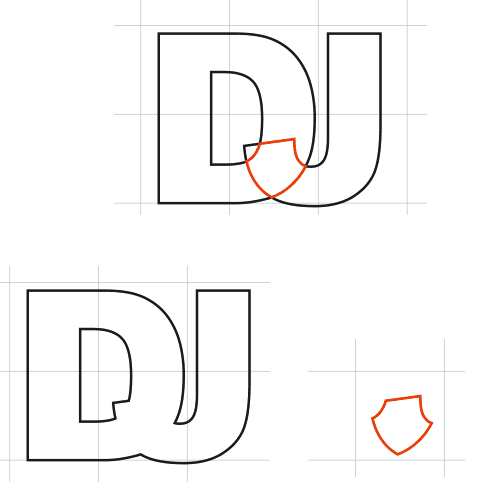
Full Version: welding text
From: Dave Jones (DAVERJ) [#9]
10 Jan 2007
To: ab_laserart [#1] 10 Jan 2007
1 - convert the letters to curves, no fill, black hairline outlines
2 - select the two curves (letters) and hit the intersect button
3 - right click on the red palette color to set the outline to red for the new curve created by the intersect (or do it in object properties)
4 - go back and reselect the original 2 curves (letters) and click the weld button
At this point you have a black outline around the outside of the combined letters and you have a red line that follows the places where they intersected. When you engrave the red lines and cut the black lines you'll end up with the welded letters cut out and the inside lines of the letters engraved.

EDITED: 10 Jan 2007 by DAVERJ
From: ab_laserart [#10]
10 Jan 2007
To: Dave Jones (DAVERJ) [#9] 10 Jan 2007
DAVE, YOU'RE A GENIUS!!
I knew it could be done without first having to attain a graduate degree in rocket science! (Unless, of course, you have a graduate degree in rocket science) 8-O
Thank you very much,
Ron
From: Pedaler (ROYBREWER) [#11]
10 Jan 2007
To: ab_laserart [#10] 10 Jan 2007
I know you said Corel 12, but the SmartFill tool with X3 makes this with fewer strokes.
From: Harvey only (HARVEY-ONLY) [#12]
10 Jan 2007
To: Dave Jones (DAVERJ) [#9] 11 Jan 2007
I tried to answer a few hours ago, but Verizon and Web service were not getting along very well at that time.
What an elegant solution. I printed it out for future use. It will get a lot of that with my projects. Thank you. Thank you. Thank you.
From: LaZerDude (C_BURKE) [#13]
11 Jan 2007
To: ab_laserart [#10] 11 Jan 2007
Ron,
Dave did what I was wanting to do. There you go. I knew there had to be a pretty easy way and that was it.