Full Version: Tile Mural Example
From: LaZerDude (C_BURKE) [#6]
13 Feb 2007
To: PenTrophy (PENINSULATROPHY) [#5] 13 Feb 2007
Mark,
Sublmation. The whales are close. NOW is it possible to bevel the edges?
From: LaZerDude (C_BURKE) [#7]
13 Feb 2007
To: Mike (MIKEN) [#2] Unread
From: LaZerDude (C_BURKE) [#8]
13 Feb 2007
To: Carl (CSEWELL) [#4] 13 Feb 2007
Carl,
Thanks. I will play around with that.
As I have mentioned, I'm taking photopaint classes in Vegas from Pradhan and that might help.
Thanks
From: Dave Jones (DAVERJ) [#9]
13 Feb 2007
To: LaZerDude (C_BURKE) [#8] 13 Feb 2007
I can tell you how to do it in Photoshop. I assume PhotoPaint has similar abilities, but since I do all my photo editing in Photoshop I can only explain it for that program.
PhotoShop has a feature called "Layer Styles". You can apply various styles to a layer. One of them is "Bevel and Emboss". It gives you an adjustable bevel on the edges of the layer. It is simple to copy that style from one layer to another.
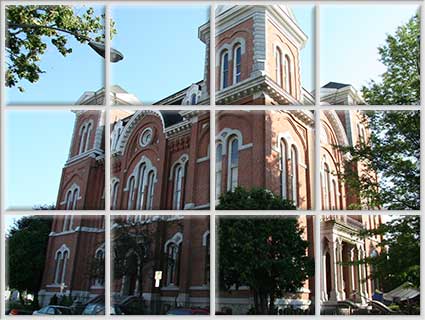
So for this image I first scaled and cropped it so I had the right number of pixels for the number of tiles and the grout areas.
I then created a layer with the grout. Just light gray lines around the outside and in a grid.
I used the selection tool to select the space in one square and then did "Copy Merged" and "Paste" to make a new layer containing one tile worth of the original. I continued doing this with each square until I had a dozen layers each containing one square of the image.
I then selected one of them and applied the layer style for Bevel and Emboss and adjusted it to look right. I then copied that style, selected the other 11 layers and pasted the style. Now the tiles all look like this.
The final step was to select the layer with the grid and apply a bevel style to it, but with the bevel going down instead of up. That's to simulate the slight groove within the grout.
From: LaZerDude (C_BURKE) [#10]
13 Feb 2007
To: Dave Jones (DAVERJ) [#9] 13 Feb 2007
BINGO! Now if I can figure out how to do that in Photopaint, I'll be on my way. I do not have photohshop, but I do have Photoshop elements 5. Would I be able to do it with that? If so, can you spoon feed me? ( insert laugh here)
Thanks Dave.
From: Dave Jones (DAVERJ) [#11]
13 Feb 2007
To: LaZerDude (C_BURKE) [#10] 13 Feb 2007
Well, I looked at PhotoPaint, and I don't really know my way around it, but there is a bevel effect in the effects menu. You select a portion of the image and can apply that effect to it. The quality of the bevel is not as good, and I don't see a simple way to apply it to a dozen areas quickly. But that may just be because I don't know the program.
I've never used Elements, but when you open it, if there is a Layers menu next to the Image menu, with Layer Style in it, then it will probably do it. I think the main difference is that Elements does not support CMYK and LAB color spaces, and is missing some of the pro conversions and filters used in preparing images for magazines, etc...
From: LaZerDude (C_BURKE) [#12]
13 Feb 2007
To: Dave Jones (DAVERJ) [#11] 13 Feb 2007
Thank you Dave.
I will look when I get home. Elements is on my notebook.