Full Version: Photograv
From: Brian (BRIAN_R) [#1]
6 Mar 2007
To: ALL
Forgive me if this has been gone over many times.
What does Photograv do that I can't do by just sending a picture to my laser? Epilog Mini.
Thanks,
Brian
From: Stunt Engraver (DGL) [#2]
6 Mar 2007
To: Brian (BRIAN_R) [#1] 6 Mar 2007
Brian,
If you "really" know your stuff with Photoshop etc., you can prepare files that will rival the results of PhotoGraV.
I'd call it the "automatic transmission" for dealing with laser engraved photos.
EDITED: 6 Mar 2007 by DGL
From: Dave Jones (DAVERJ) [#3]
6 Mar 2007
To: Brian (BRIAN_R) [#1] 6 Mar 2007
If you select "Photograph" in the advanced tab of the Epilog driver it will print your photo using a dithering pattern, which gives a fairly decent photograph.
Photograv converts images into that same style of dithered dot pattern, but gives you much more control over the conversion and the quality of the image.
You can also use PhotoShop or PhotoPaint to convert an image to a dither pattern, but those are automatic conversions like the Epilog driver and lack the extra level of interactive controls that Photograve gives you.
I am very experienced in PhotoShop and can get almost the same results in Photoshop as in PhotoGrav, but Photograv has additional controls over the conversion that allow subtle increases in quality which I like. Most Photoshop experts might not care about that extra little control, but personally I like it.
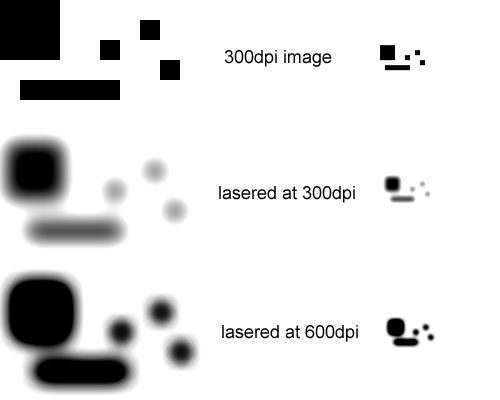
One of the main reasons I like to convert an image to a dither pattern before it goes to the laser is that I will often convert to a dither pattern at a different resolution than I laser at. I feel this gives a much richer result on certain materials.
For example I will crop and enhance my image in Photoshop and then export it at 300 dpi to Photograve, where it gets dithered at 300 dpi. I then send it to the laser and engrave at 600 dpi. That means for every dot in the Photograv image the laser is hitting the material 4 times. Often a single hit of the laser doesn't have the same effect on the material as a group of hits next to each other. So doing this makes the individual dots of the dithered image stand out better and creates a richer looking image.
From: Rodney Gold (RODNEY_GOLD) [#4]
6 Mar 2007
To: ALL
It processes the pic so that you have like a 95%+ chance of it coming out acceptably. You can do similar yourself , but you jump thru hoops to do so and your chances of success are much lower.
It is not only good for Photos , but also will enable you to engrave complex multicoloured/complex fill vector images with excellent results.
Its way overpriced imho if you intend to use it occasionally and it hasnt been updated in 4-5 yrs either.
From: Mikey (MIKE2449) [#5]
7 Mar 2007
To: Dave Jones (DAVERJ) [#3] 7 Mar 2007
Dave:
I'm the new guy to this. My machine is due here today. I have learned over the last couple of weeks Corel Paint, Corel DrawX3 and Photograv--learned as best as I can without a machine. Some years back I was in the imaging biz. Back then I knew Photoshop fairly well (Photoshop5). You said you will convert upwardly when you send the image to engrave. My question is this--I spent a fair dollar on a rather large scanner, would not it be better to start really rich and work downward? If I understand this correctly, when you "rez up" an image, we are borrowing info from the closest pixel. In the imaging biz, this didn't always give good results, especially when we took a small image and made it very large.
Just interested in getting your input. Thanks in advance for your time.
Michael
From: Stunt Engraver (DGL) [#6]
7 Mar 2007
To: Mikey (MIKE2449) [#5] 7 Mar 2007
Have you tried Genuine Fractals, S-spline, or other photo enlargement software?
It's meant to take images larger, without losing as much detail, or making the graphic look like it was created on an Etch-A-Sketch.
From: Harvey only (HARVEY-ONLY) [#7]
7 Mar 2007
To: Mikey (MIKE2449) [#5] 7 Mar 2007
To do it with Corel Paint, for example, you have to have a good resolution in order to do the proper manipulation to laser it well. We may rez up but also size down usually. The pixels do not get too bad that way.
The reason I rez up to usually 1000 DPI is when you select the 'Fixed 8X8' filter it is rezing down a bit, quite a bit. It ends up with a resolution of 125 DPI. It does not look that bad because when engraved you are outputting actually at 1000DPI with variances in the pixel clusters. It may sound strange, but it works well.
That filter puts out the sort of dot pattern used in newspapers, (usually about 50 DPI in newspapers). The dots expand in the nearby pixels to produce 64 shades of grey.
From: Dave Jones (DAVERJ) [#8]
7 Mar 2007
To: Mikey (MIKE2449) [#5] 7 Mar 2007
Actually, no, I don't convert upward when going to Photograv. In the example I was talking about I might start with an image in the range of 1200 dpi. I do any manipulations and level enhancements I want to it, and then scale it down to 300dpi. I then run it through Photograv.
I then laser that at 600dpi. I'm not doing that to try and increase the resolution. What I'm doing is making the laser fire 4 times on each dot of the converted image. That is because a cluster of 4 hits by the laser makes a solid spot on the material. The result is usually better than engraving the 300dpi dithered image at 300dpi on the laser, and is actuall usually better than making a 600dpi image and lasering that at 600dpi.
The reason is that I've foind that on many materials if you fire a single hit of the laser in an isolated part of the material that hit is weaker than the equivalent dot when it is fired next to another one. This may not be true if you raster at very slow speeds, but time is money so I don't want to go extremely slow. At 600dpi on the laser the dots from the laser slightly overlap which gives a stronger hit than what you get at 300dpi. It's not just about having more dots, it's about the overlap causing a deeper burn.
This only works if you use a dpi setting on the laser that is exactly twice what the dpi was in Photograv.
And it's important when using Photograv to make the image be the correct resolution, and have it be the same as or an exact division of the dpi used on the laser.
Another way of looking at this technique is that the dithering is simulating shades of gray based on spacing of dots in the image. It works well if every dot of the dithered image has the same intensity on the final products, no matter if they are individual dots with nothing touching them or a series of several dots that are touching each other.
I've found that individual dots fired by the laser to be weaker than the dots that are touching each other. By making the laser fire 4 times for each dot of the image you make each dot of the image have a more uniform look and therefore the resulting photograph comes out of the laser looking more like the image that came out of Photograv. I do a lot of black anodized aluminum and found it especially important with that. But I feel it improves the look on wood also.
From: Dave Jones (DAVERJ) [#9]
7 Mar 2007
To: Mikey (MIKE2449) [#5] 7 Mar 2007
From: Mikey (MIKE2449) [#10]
7 Mar 2007
To: Dave Jones (DAVERJ) [#9] 8 Mar 2007
Dave--Dave L & Harvey:
I turned on the machine shortly after it arrived. At the moment I am concentrating on stone, later will do glass, wood, metals, etc. Some time ago one of you advised "become the consumate expert at what you do"--this is where I hope to be.
I have much to learn, however, your input is really shortcutting the learning curve and I thank you all! The sales rep is due in here this morning to do the lesson stuff. Before he shows I'm going to play with the info you just gave me. I have several images scanned at 1200 dpi. I checked out my experimenting of last evening with my 125x lupe--I am finding certain patterns in the points of the differing resolutions. Will be at it all day today. I actually produced one really kick butt image last night by accident. Now armed with the info you guys have shared, today should be interesting.
Dave L--I remember some years ago when "Fractal" was new to the market. We actually did some beta testing for them, at that time what they had didn't really work that well. Sounds as if they have worked it out. I would be interested in checking these out--my guess is that they are pricey.
I will let you all know how we do today--perhaps a pic of what we produce.
From: Stunt Engraver (DGL) [#11]
7 Mar 2007
To: Mikey (MIKE2449) [#10] 9 Mar 2007
Nothing better than playing with new toys that will make money.
Very exciting!
From: Harvey only (HARVEY-ONLY) [#12]
8 Mar 2007
To: Mikey (MIKE2449) [#10] 9 Mar 2007
I just realized that I left one critical point out of my post.
Size your image before you convert to 1,000 DPI and do not resize it afterward. If you do you will get lines through it when lasering. It must be converted at the exact size it will be used at. The dot pattern will be messed up on even the slightest resize.
If you have a high resolution printer you will see the patterns and what they will give. If the printer is not 500 or 1,000 DPI on the nose you might get lines there also, but it will give you a feel for the looks. (If the printer goes to 1280 DPI do the experiments at 1280 DPI for flawless results.)
From: Laser Image (LASER_IMAGE) [#13]
8 Mar 2007
To: Mikey (MIKE2449) [#10] 9 Mar 2007
Michael,
With enough practice you will find that the "accidental kick butt image" happens more and more frequently. It sounds like you are on the path to making that happen. Good luck and keep at it!
Gary
From: Dave Jones (DAVERJ) [#14]
8 Mar 2007
To: Mikey (MIKE2449) [#10] 9 Mar 2007
If you haven't done so already, get a notebook and write down every experiment you do. The resolution of the image, the settings of the laser, and the results. Make lots of notes.
Then in a seperate section of the notebook put down a summary of the settings that work best for each material and for each resolution of the graphic. A week from now (or maybe an hour from now) you won't be able to keep straight which settings you used for that one that came out just right.
The note taking will be frenzied for a few weeks and then very little gets added as you do the same stuff over and over. But each time you try new materials or combinations of settings and resolutions, you'll want to write down which ones worked and which didn't.
From: chad (FEVERRIVER) [#15]
9 Mar 2007
To: ALL
From: Stunt Engraver (DGL) [#16]
9 Mar 2007
To: chad (FEVERRIVER) [#15] 9 Mar 2007
Here's are some past discussions on the subject of banding. If you use the search function and select the Laser Engraving folder, using band or banding as your keyword, you'll find more.
http://engravingetc.org/forum/index.php?webtag=EE&msg=6078.1
http://engravingetc.org/forum/index.php?webtag=EE&msg=5808.1
http://engravingetc.org/forum/index.php?webtag=EE&msg=1882.1
From: Barbara (RGILE) [#17]
9 Mar 2007
To: chad (FEVERRIVER) [#15] 9 Mar 2007
that happened to me, and cleaning the rollers on the top of the bar where the laser goes back and forth is where I had the buildup, once I cleaned that it went away.
Hopefully, that's all that's wrong.
Good luck,
Barbara
From: Harvey only (HARVEY-ONLY) [#18]
9 Mar 2007
To: chad (FEVERRIVER) [#15] 9 Mar 2007
Your profile is not filled out so I do not even know what machine you are talking about. The causes can be different depending on the machine. It could be a resolution conflict, but on a ULS that would be rare.
How many LPI and at what DPI would also be helpful.
From: Dave Jones (DAVERJ) [#19]
9 Mar 2007
To: chad (FEVERRIVER) [#15] 9 Mar 2007
What laser?
Were you using Photograv (or doing halftone or dither in your paint program) or sending a grayscale image directly to the laser?
What resolution image?
What settings on the laser?
From: chad (FEVERRIVER) [#20]
9 Mar 2007
To: Dave Jones (DAVERJ) [#19] 9 Mar 2007
EDITED: 9 Mar 2007 by FEVERRIVER
Show messages: 1-20 21