Folder Laser EngravingVector Cutting Method


Warning Press Ctrl+Enter to quickly submit your post
Quick Reply  
✏✏✏✏✏✏✏✏✏✏


Next
 From:  Engravin' Dave (DATAKES)
 To:  ALL
6287.1 
Have any of you used the vector cutting method described below that is recommended by Rowmark? The description is an excerpt from a very nice reference Rowmark offers on their website at http://www.rowmark.com/MARK/laser_guide/pages/intro.asp

-----------------------------------------


Our experiences show that the most effective method for vector cutting is to cut from the back to the front. This requires the on-screen image to be flipped in order for the cut piece to be right reading and to place the material in the laser bed face down. It also requires cutting directly on the laser bed, not on a honeycomb insert. (When the laser hits the edges of the honeycomb cells, it bounces back causing a pitting that will ruin the surface of the material it is in contact with.) Whenever it is convenient, leave the factory masking on the front surface and if good results are still not being achieved, try spraying the bed with water to absorb heat before laying the material face down with the masking on. If two passes still prove necessary, adjust the first setting so the cut travels nearly all the way through the substrate. The second cut, the one affecting the face of the material, should be adjusted to a much cooler setting, just enough to cut through the remaining substrate and cap. This method is successful with nearly all Rowmark products, including the thickest (1/8") stock, and can result in no surface damage.


Often it is necessary to cut and engrave in one operation. When cutting face down, it is necessary to cut first, flip the cut pieces and remove the masking, all before engraving. There should be no registration problems, since the background serves as a template. Irregular shapes pose a greater problem and require more planning in order to ensure good registration. If removing the masking from the individual pieces before engraving becomes an issue, take the masking off before cutting, but be sure to mist the engraving bed with water to help absorb heat and prevent burning before laying down the material.

----------------------------------------------------

EDITED: 10 Mar 2007 by DGL


Previous
Next
 From:  Carl (CSEWELL)
 To:  Engravin' Dave (DATAKES) 
6287.2 In reply to 6287.1 
Yes, I use that method when cutting shapes for future use (nametags, for one). There's less clean-up on both sides and the clean-up is easier, in most cases. I don't mist the underside, though.

Carl

  Guntersville Laser Engraving
  Guntersville, AL
  http://www.GuntersvilleLaser.com

Previous
Next
 From:  Tony (ANTE)
 To:  Engravin' Dave (DATAKES) 
6287.3 In reply to 6287.1 

Hi Dave,
When doing control panel layouts on reverse lasermark
I use that method and set speed and power to vector cut
holes so that i do not cut trough front mask at all.
No water mist.

Tont @ MCE
____________________


Previous
Next
 From:  JHayes55
 To:  Engravin' Dave (DATAKES) 
6287.4 In reply to 6287.1 
David - I had read this one on the Rowmark site before. Personally, it is not a method I can live with. Consider doing 3 thousand 2.5" engraved and cut out circles and having to flip each one, remove the plastic and then engrave - not very efficient in my book. The only good reason for this method is to avoid clean up of engraving deposits on the surface of the plastic - depending on the color we need very little cleanup if engraved/cut at proper power and speed. When we do need clean up on a few of the problem colors we use different methods to do the clean up - most commonly Mr. Clean Magic Eraser. Someone here on the forum gave me that tip a year ago.
Joe

EDITED: 10 Mar 2007 by JHAYES55


Previous
Next
 From:  Engravin' Dave (DATAKES)
 To:  ALL
6287.5 In reply to 6287.4 

Thanks for all of your responses. I was hoping to learn how much of an impact the misting had in actually lessening the heat buildup on the under side of the plastic.

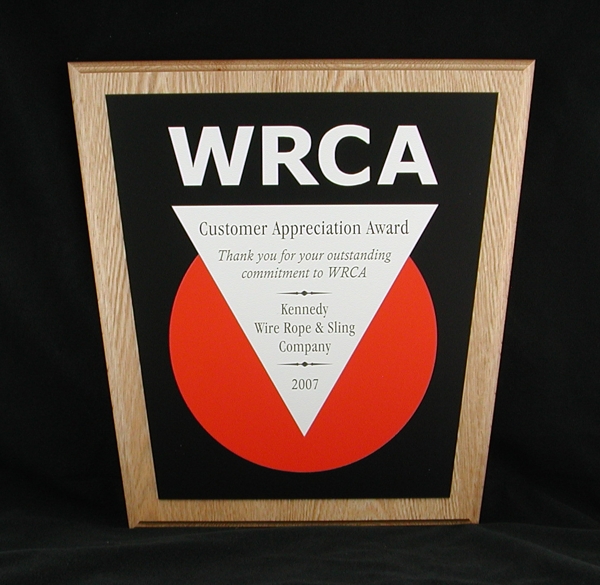
I don't do a great deal of vector cutting, but the other day I stepped a little outside of my comfort zone with my creative thoughts and came up with a plaque design for a customer that uses their 3-color logo as the plaque plate that would ultimately contain some engraved text.

Since the logo would be cut out of three different colors of material, then put together like a puzzle, I wanted the cutting tolerances to be pretty precise, hopefully producing a clean look at the seems with no noticable gaps.

Well, I did my cutting today, will raster the text and adhere to the plaque boards Monday.

I hope my customer is as thrilled with the results as I am. I was a little nervous over this one, but my equipment came through with flying colors.

I'll post a picture of the finished product on Monday.


Previous
Next
 From:  Mike (MIKEN)
 To:  Engravin' Dave (DATAKES) 
6287.6 In reply to 6287.5 

Dave:

For most of my cutting applications the Rowmark suggestion isn't the answer. I'm doing name tags and office name plates which obviously must be engraved and cut face up on the laser in the same operation.

IF it's a straight vector cut then I agree that cutting from the back is better, but on a grid and all the way through. The trick is not to overpower the cut and to mask it.

When doing inlays cutting from the back is the preferred method as you can reduce the laser kerf and get a better fit.

Herre's a picture (not good) of an abalone inlay I just finished. The abalone was cut from the back in numerous passes.

Mike Null
Dist. of Lazer Cutting Grid
www.stl-laser.com

EDITED: 10 Apr 2007 by MIKEN


Previous
Next
 From:  JHayes55
 To:  Mike (MIKEN) 
6287.7 In reply to 6287.6 
Very nice Mike.
quote:
The abalone was cut from the back in numerous passes.


How thick was the abalone?
Joe
 

Previous
Next
 From:  Mike (MIKEN)
 To:  JHayes55 
6287.8 In reply to 6287.7 
Joe:

It was .050" and I cut it in several passes because I was afraid I would fracture it. It is very delicate and has many varying densities.

I applied glue to the rastered part and pressed the abalone into place with a piece of hardwood and light taps with a hammer. Then sanded it smooth.

Enough to do four names is about $50.

Mike Null
Dist. of Lazer Cutting Grid
www.stl-laser.com


Previous
Next
 From:  Doc (GREAT_ATLANTIC)
 To:  Engravin' Dave (DATAKES) 
6287.9 In reply to 6287.5 

Dave...

When cutting the inside pieces of the plastic, how did you account for the kerf of the laser cut....do you make those pieces slightly larger? Ive not done any inlay, but it's one of those things on the list I'd like to try (...the same for wood intarsia.) Does this technique improve the cut?


Jim


Previous
Next
 From:  Stunt Engraver (DGL)
 To:  Mike (MIKEN) 
6287.10 In reply to 6287.8 
Mike,

There is, or used to be, thin sheets of abalone (abalone-like?) made specifically for laser inlay.

The material also came in other colors and patterns.

David "The Stunt Engraver" Lavaneri
DGL Engraving
Port Hueneme, CA


Previous
Next
 From:  Stunt Engraver (DGL)
 To:  ALL
6287.11 

Here's a post where Mike Mackenzie elaborates on the inlay process and in an ensuing post, the abalone (Ablam) material I spoke of:

http://engravingetc.org/forum/index.php?webtag=EE&msg=647.9

David "The Stunt Engraver" Lavaneri
DGL Engraving
Port Hueneme, CA

EDITED: 11 Mar 2007 by DGL


Previous
Next
 From:  Mike (MIKEN)
 To:  Doc (GREAT_ATLANTIC) 
6287.12 In reply to 6287.11 
Doc:

The abalone is a natural shell material with varying degrees of density. I enlarged my drawing by .005" to allow for the kerf and was able to do the first piece but on the second I only enlarged the drawing by .002".

If I were inlaying plastic or wood where I cut through the material I would go back to the .005".

David:

My customer provided the material and requested that I use it as opposed to the thinner ablam.

I used blue painters tape on the underside to keep the material together.

I concur with the remarks by Mike Mackenzie.

Mike Null
Dist. of Lazer Cutting Grid
www.stl-laser.com


Previous
Next
 From:  Stunt Engraver (DGL)
 To:  Mike (MIKEN) 
6287.13 In reply to 6287.12 
Mike,

The customer's always right!

I've always been fascinated by inlay work. It would be one of the reasons I'd buy a laser.

David "The Stunt Engraver" Lavaneri
DGL Engraving
Port Hueneme, CA


Previous
Next
 From:  Doc (GREAT_ATLANTIC)
 To:  Mike (MIKEN) 
6287.14 In reply to 6287.12 
Fantastic...thanks Mike, I think I'll give it a try!

Jim


Previous
Next
 From:  Engravin' Dave (DATAKES)
 To:  ALL
6287.15 In reply to 6287.5 
Below is the finished plaque that I created by vector cutting three different colors of plastic. The customer wanted a oak plaque, so I had Studio Workshop cut the plaques in a trapazoid shape to match the logo dimensions.

EDITED: 12 Mar 2007 by DGL


Previous
Next
 From:  Doc (GREAT_ATLANTIC)
 To:  Engravin' Dave (DATAKES) 
6287.16 In reply to 6287.15 
Nice job, Dave....I'm inspired by you guys to give it a shot! Did you use the same .005 size adjustment that Mike suggests?

Jim


Previous
Next
 From:  Engravin' Dave (DATAKES)
 To:  Doc (GREAT_ATLANTIC) 
6287.17 In reply to 6287.16 

Jim,

Thank you.

I did a test run on a small piece of the same material which resulted in such a nice snug fit, I decided to run without an adjustment. I used Rowmark's LaserMax material from Johnson Plastics.

Mike offered very sound advice. The figure will likely need to be adjusted based on your machine, as well as the material you are cutting, be it wood, plastic, acrylic, etc.

EDITED: 12 Mar 2007 by DATAKES


Previous
Next
 From:  Stunt Engraver (DGL)
 To:  Engravin' Dave (DATAKES) 
6287.18 In reply to 6287.15 
Lookin' good David!

Did you use typical engraving stock for the three colors?

David "The Stunt Engraver" Lavaneri
DGL Engraving
Port Hueneme, CA


Previous
Next
 From:  Engravin' Dave (DATAKES)
 To:  Stunt Engraver (DGL) 
6287.19 In reply to 6287.18 
Rowmark LaserMax .0625"

Previous
Next
 From:  Stunt Engraver (DGL)
 To:  Engravin' Dave (DATAKES) 
6287.20 In reply to 6287.19 
Very impressive!

I'm glad you explained the plaque was intentionally shaped as a trapezoid.

I thought it was a weird camera angle. :-)

David "The Stunt Engraver" Lavaneri
DGL Engraving
Port Hueneme, CA


Show messages:  1-20  21-24

Rate my interest:

Adjust text size: Smaller 10 Larger

Beehive Forum 1.0.1 |  FAQ |  Docs |  Support |  Donate! ©2002 - 2024 Project Beehive Forum

Forum Stats